Snag my Blinkie


MY SISTERHOOD SITE

Stores I Stalk


BLOGS I LOVE


Popular Posts
-
 Bad Girl Supplies Kim's Korner Scrap Kit: Bad Girls Club here: http://www.scrapswithattitude.com/store/ Tube of Choice Im using Lady ...
 -
 FTU KIT Simply Black and White Supplies Scrap by ALI Simply Black and White here: http://designsbyali.blogspot.com/ Tube of Choice Im...
 -
 FTU Springy Supplies Deanna(Butterfly Kisses Scraps) Scrap Kit: FTU Mini Kit St. Patty http://bkscraps.blogspot.com/ Tube of Choice Im usin...
 -
 Tattoo Freak Supplies Addictive Pleasure's Scrap kit Tattoo here: http://addictivepleasures.blogspot.com/ Tube of Choice Im using...
 -
 Puppy Love is All I need! Supplies Jens Sweet Temptations Puppy Love here: http://scrapsandthecity.com/ Tube of Choice Im using Anna Li...
 -
 Neon Punk! Supplies Addictive Pleasures & Toxic's FREEBIE Scrap Kit: Neon Punk here: http://addictivepleasures.blogspot.com/0b6 ...
 -
 Now I lay me down to sleep... Supplies Needed Scrap by: Mystical Illusionz which can be found here: http://mystical-illusionz.blogspot.c...
 -
 Da Bomb! Supplies SkyScraps Scrapkit Pussy Cat Doll here: http://scrapsandthecity.com/ Tube of Choice Im using Elias Chatzoudis which ...
 -
 Aloha Supplies Rieka_Rafita Scrapkit Aloha Summer here: http://www.scrapswithattitude.com/store/index.php?main_page=index&cPath=70...
Wednesday, March 30, 2011
 Strawberry Cutie!

Strawberry Cutie!
Supplies
Rieneke Designs Scrap Kit: Strawberry Delight
here:
Tube of Choice Im using Suzanne Woolcott which you can buy HERE:
Font of Choice
Eye Candy(optional)
Vix mask with you can DL here:
Open new image 600x600
Open paper 3 copy and paste as a new layer.
Open Vix's mask 431.
Paper raster new mask layer from image.Choose Vix's mask 431. Layers merge group.
Open element 47 copy and paste as a new layer above your mask.
Open element 58 copy and paste as a new layer over element 47. Add drop shadow.
Open element 33 duplicate copy and paste as a new layer. Mirro and flip and paste in the upper right corner as I have. Ad drop shadow.
Open element 51 copy and paste as a new layer under element 33.Mirror and place on opposite side. Add drop shadow.
Open element 48 resize by 100 copy and paste as a new layer at the bottom left corner of your tag.Make sure it is under the Frames.Add drop shadow.
Open element 49 copy and paste as a new layer at the bottom of the frame as I have. Add drop shadow.
Open element 36 resize by 150 copy and paste as a new layer at the bottom left corner. Add drop shadow.
Open element 24 resize by 300 copy and paste as a new layer at the bottom right of your tag.Add drop shadow.
Open element 42 resize by 150 copy and paste as a new layer in front of your bucket. Add drop shadow.
Open element 17 copy and paste as a new layer in the middle of your tag. Add drop shadow.
Open element 75 resize by 100 copy and paste as a new layer in from of your bucket and flowers. Add drop shadow.
Open element 29 resize by 200 copy and paste in the upper left corner as I have. Add drop shadow.
Open your tube and place in the center of your tag.Add drop shadow.
If you used the tube i did open element 57 resize by 100 copy and paste over the end of the ropes.
Thats it your finished with your tag! :)
Add artist copyright info add name layers merge and your done!My tut is just a guide you can totally make it your own!
Thanks again for trying my tuts!
Vikkey
Monday, March 28, 2011
Cowgirl Up!

Cowgirl Up!
Supplies
Missy's Scrap Kit: Bandana-n-Denim Tagger
here:
Tube of Choice Im using Keith Garvey which you can buy at PTE HERE:
Font of Choice
Eye Candy(optional)
Vix mask with you can DL here:
Open new image 600x600
OPen paper 2 copy and paste as a new layer.
Oen Vix's mask 197.
Paper raster new mask layer from image.Choose Vix's mask 197. Layers merge group.
Open heart frame 2 resize by 600 copy and paste as a new layer.
Choose magic wand click inside frame selections modify expand by 8.
copy and paste paper7 as a new layer selections invert delete. Drag paper under frame.
Open heart frame 1 resize by 550 copy and paste as a new layer above frame2 as I have.
Add drop shadow.
Open wrap 1 resize by 500 copy and paste as a new layer at the top of your frames as I have.
Duplicate mirror place on opposite side as I have.
Add drop shadow.
OPen folded Cloth1 resize by 200 copy and paste as a new layer in the center of the bow at top. Add drop shadow.
Open torn bow 2 copy and paste as a new layer over the clasp in the previous steps as I have. Add Drop shadow.
OPen flowers 1 and 2 resize by 200 copy and place at the bottom of the frames toward the side of the frames as I have. Add drop shadow.
Open butterfly 1 resize by 200 copy and paste as a new layer on each side of the Frame above the flowers as I have. Add drop shadow.
Open star resize by 600 copy and paste as a new layer at the bottom of your frame.Add drop shadow.
Now choose a font and write out *COWGIRL UP*.Convert to raster layer.
Effects plugins eyecandy choose gradient glow with these settings:
Glow width: 7.00 Soft corners: 25 Overall opacity 100.
Repeat these steps with different colors to your liking.
Thats it your finished with your tag. :)
Open your choice of tube copy and paste as a new layer in the middle of your tag. Add drop shadow.
Add artist copyright info add name layers merge and your done!My tut is just a guide you can totally make it your own!
Thanks again for trying my tuts!
Vikkey
Love &Goth

Love and Goth!
Supplies
Stef's Scrap Kit:Purple Grunge
Tube of Choice Im using Elias Chatzoudis which you can buy at PTE HERE:
Font of Choice
Eye Candy(optional)
Open new image 600x600
Open wordart 02 copy and paste as a new layer.Add drop shadow.
Open frame8. Resize by 600 copy and paste as a new layer above the word art.Make sure the words are covered. Only the white and black should be showing as I have did it. Add drop shadow.
Choose magic wand click inside frame selections modify expand by 8.
Open paper 4 copy and paste as a new layer.
Selections invert delete.Drag paper under frame.
Open heart 05.Resize by 200 copy and paste as a new layer on the left side of your frame. Add drop shadow.
Open lips 01 resize by 300 copy and paste as a new layer.In the middle of your frame. Add d rop shadow.
OPen bow 4 resize by 200 copy and paste as a new layer in the right upper corner of your frame.Add d rop shadow.
Open bow 3 resize by 150 copy and paste as a new layer above bow 4. Add Drop shadow.
Open flower 3 and 4 resize by 150 copy and paste as a new layer on each end of the frame as I have. Add drop shadow.
Open ribbon 2 copy and paste as a new layer at the bottom of the frame. Under your flowers.Add drop shadows.
Open wordart 3 resize by 300. Copy and paste as a new layerat the bottom of your frame. Add drop shadow.
Thats it your finished with your tag. :)
Open your choice of tube copy and paste as a new layer in the middle of your tag. Add drop shadow.
Add artist copyright info add name layers merge and your done!My tut is just a guide you can totally make it your own!
Thanks again for trying my tuts!
Vikkey
She's such a Punk Star!

She's Such a Punk Star!
Supplies
Toxic's Scrap Kit:Punk Star 2
Tube of Choice Im using Arthur Crow which you can buy at PTE HERE:
Font of Choice
Eye Candy(optional)
Open new image 600x600
Open Wire copy and paste as a new layer.Add d rop shadow.
Open scatter skulls copy and paste as a new layer over the wire. Add drop shadow.
Open Punkstar Doodle copy and paste as a new layer.Duplicate mirror and paste as I have. Add drop shadow.
Open frame2 copy and paste as a new layer above the previous steps. Add drop shadow.
Open Sparkles copy and paste as a new layer.
Open Frame3 copy and paste as a new layer.
Choose magic wand click inside frame selections modify expand by 8.
Open paper 16 copy and paste as a new layer.
Selections invert delete. DO NOT SELECT NONE YET.Drag paper under frames.
Open tube of choice copy and paste on top of your frame. Selection invert delete.
Do the same steps as above to put it ont the other side of your frame.
Open chain copy and paste as a new layer above and below your frame as I have. Add drop shadow.
Open beaded string1 copy and paste as a new layer under your frame on each side. Add drop shadow.
Open beaded string2 Image rotate free rotate 90.
Copy and paste as a new layer on the top and bottom of your frame. Add drop shadow.
Open skull 2 resize by 150 copy and paste as a new layer on each side of your frame at the bottom. Add drop shadow.
Open skullafly resize by 200 copy and paste as a new layer at the top of your frame.I added it to both sides. Add drop shadow.
Thats it your finished with your tag. :)
Open your choice of tube copy and paste as a new layer in the middle of your tag. Add drop shadow.
Add artist copyright info add name layers merge and your done!My tut is just a guide you can totally make it your own!
Thanks again for trying my tuts!
Vikkey
Wednesday, March 23, 2011
My Rapunzel

My Rapunzel
Supplies
Scrapping Mar Scrap Kit:Enchanted Princess
Tube of Choice Im using Tony Tzanoikakis which you can buy at PTE HERE:
Font of Choice
Eye Candy(optional)
Open new image 600x600
Open Enchanted Princess25 resize by 600 copy and paste as a new layer.
Choose magic wand click inside frame selections modify expand by 8.
Open paper 3 copy and paste as a new layer.
Selections invert delete. DO NOT SELECT NONE YET.Drag paper under frames.
Open Castle resize by 500 copy and paste on top of your frame. Selection invert delete. I changed the opacity of the castle to 50%.
Open enchanted princess50 resize by 200 copy and paste under your frame as I have making sure you can see it on the inside of your frame. Add drop shadow.
Open enchanted princess 51 and 52 resize by 200 copy and paste on each outer side of the frame as I have.
Open enchantedPrincess59 resize by 300 copy and paste as a new layer toward the bottom of your frames.Add drop shadow.
Open enchantedPrincess61 resize by 200 copy and paste as a new layer right above enchantedPrincess59.Add drop shadow.
Open enchantedPrincess60 resize by 200 copy and paste as a new layer above enchantedPrincess61.Add drop shadow.
Open enchanted princess49 resize by 200 copy and paste as a new layer on each leg of the frame.
Open enchanted princess48 resize by 150 copy and paste as a new layer on top of enchanted princess49.
Open enchanted princess47 resize by 100 copy and paste as a new layer on top of enchanted princess48.
Add drop shadow's.
Finally
Open enchanted princess18 resize by 200 copy and paste as a new layer on top of the frame.Add drop shadow.
Thats it your finished with your tag. :)
Open your choice of tube copy and paste as a new layer In the middle of your frame
. Add drop shadow.
Add artist copyright info add name layers merge and your done!
My tut is just a guide you can totally make it your own!
Thanks again for trying my tuts!
Vikkey
Who's Afraid of the Big Bad Wolf?!

Who's Afraid of the Big Bad Wolf?!
Supplies
Rieka_Rafita Scrap Kit:The Twilight Saga Eclipse
Tube of Choice Im using Tony Tzanoikakis which you can buy at PTE HERE:
Font of Choice
Eye Candy(optional)
Vix mask with you can DL here:
Open new image 600x600
Open paper 13 copy and paste as a new layer.
New mask layer from image Vix mask 196. Layers Merge group.
Open Frame 1 copy and paste as a new layer in middle of your mask.Add drop shadow.
Choose magic wand click inside frame selections modify expand by 8.
Open paper 3 copy and paste as a new layer.
Selections invert delete. Drag paper under frames.
Open Moon copy and paste as a new layer in the middle of your frame. add drop shadow.
Open wold 2 resize by 300 copy and paste on top of your moon I changed the opacity to 50%.
Open tree copy and paste as a new layer on the side of your frame. Duplicate mirror and place on the other side. I added white drop shadow,but you can use whatever color that suits you.
Open sparkles and place under your frame. I also added white drop shadow to these.
Open glitter trail and place at the bottom of your frame. Make sure it is under your tree's.
Open wolf one resize by 300 copy and paste as a new layer. Duplicate mirror and place as I have.
Choose a font and write out Who's Afraid of the Big Bad Wolf?!
Place at the bottom of the tag.Convert to a raster layer.
Effects Eyecandy Gradient glow with these setting's: GLow width: 6.00 Soft Corners:25 Opacity:100 Color white first hit ok go back to eyecandy red then black.
Thats it your finished with your tag. :)
Open your choice of tube copy and paste as a new layer behind the wordart as I have. Add drop shadow.
Add artist copyright info add name layers merge and your done!My tut is just a guide you can totally make it your own!
Thanks again for trying my tuts!
Vikkey
Happy Easter!

Happy Easter
Supplies
Stef's Scrap Kit:Happy Easter
Tube of Choice Im using Tony Tzanoikakis which you can buy at PTE HERE:
Font of Choice
Eye Candy(optional)
Vix mask with you can DL here:
Open new image 600x600
Open paper 22 copy and paste as a new layer.
New mask layer from image Vix mask 99. Layers Merge group.
Open Frame 13 copy and paste as a new layer in middle of your mask.Add drop shadow.
Open frame02 resize by 500 copy and paste as a new layer over frame 13.
Choose magic wand click inside frame 02 selections modify expand by 8.
Open paper 13 copy and paste as a new layer.
Selections invert delete. Drag paper under frames.
Open ribbon 9 resixe by 300 copy and paste as a new layer.
duplicate mirror and paste again. Add drop shadows.
Open candy 04 copy and paste as a new layer in the middle of your frames. Make sure your drag it under your frames but above the paper. Add drop shadow.
Open eggs resize by 350 copy and paste as a new layer at the bottom of your frames. Add drop shadow.
Open flowers 4,5,& 6 resize by 200 copy and paste as a new layer on each side of your frame like I have.Add drop shadows.
Open your choice of tube copy and paste as a new layer behind the eggs as I have. Add drop shadow.
Add artist copyright info add name layers merge and your done!My tut is just a guide you can totally make it your own!
Thanks again for trying my tuts!
Vikkey
Monday, March 21, 2011
Sexy Spring Bunny

Sexy Spring Bunny
Supplies
Toxic Desirez Scrap Kit:Cute Bunny
Tube of Choice Im using Elias Chatzoudis which you can buy at PTE HERE:
Font of Choice
Eye Candy(optional)
Vix mask with you can DL here:
Open new image 600x600
Open paper 1 copy and paste as a new layer.
New mask layer from image Vix mask 431. Layers Merge group.
Open sparkles copy and paste as a new layer.over your mask.
Open Fence resize by 350 copy and paste as a new layer in middle of your mask.Add drop shadow.
Open dragonflies resize by 375 copy and paste as a new layer on each end of the fence as I have. duplicate mirror and place at the other side. Add drop shadow.
Open clouds resize by 450 copy and paste as a new layer at the top of your tag twice.
Open grass and resize by 500 copy and paste at the bottom of your fence. Add drop shadow.
OPen flower ribbon free rotate copy and paste as a new layer along the top of the fence. Add drop shadow.
Open the egg hanger and resize by 300 copy and paste as a new layer above the flower ribbon. Add drop shadow.
Open mushroom resize by 100 copy and paste as a new layer on each side of your fence.Add drop shadow.
Open cute bunny egg 3 copy resize by 150 copy and paste as a new layer.Duplicate mirror and place on opposite side of the tag. Make sure they are under the mushroom Like I have.
Open the bunny and flowers resize by 200 copy and paste as a new layer.Place it on each side of the tag at the bottom on each end of the grass. Add drop shadow.
Open cute bunny Spring wordart resize by 400 copy and paste at the bottom.Add drop shadow.
Open butterfly 1 and butterfly 3 resize by 100 copy and paste as a new layer at the top of the tag. I used the raster deform tool to turn them slightly. Add drop shadow.
Open your choice of tube copy and paste as a new layer behind your wordart as I have. Add drop shadow.
Add artist copyright info add name layers merge and your done!My tut is just a guide you can totally make it your own!
Thanks again for trying my tuts!
Vikkey
MY FIRST AWARD!
I've just received my first award!
Thank you so much Rockin Robin's Tuts!

The aim of the award is to bring recognition to blogs with minimal followers. Since I have accepted the award I must pass it on to at least 3 other blogs (but not more than 5), that have inspired me and I feel deserve a bit more attention. The rules are to say thank you on my blog to the one who passed it on to me (Thank you Robin!!!) and link to their blog (see above). Pick the blogs to pass the award on to, leave a note on their blog and then list them with links to their blogs...
The Blogs I Chose Are!


Finding Emo

Finding Emo
Supplies
Jay(Bello Scarto) Scrap Kit:Finding Emo
http://belloscarto.blogspot.com/
Tube of Choice Im using Elias Chatzoudis which you can buy PTE HERE:
http://psptubesemporium.com/index.php?p=home
Font of Choice
Eye Candy(optional)
Vix mask with you can DL here:
http://www.freewebs.com/vixpsp/masks.htm
Open new image 600x600
Open paper 13 copy and paste as a new layer.
New mask layer from image Vix mask 374. Layers Merge group.
Open frame element 16 resize by 600 copy and paste as a new layer.
Magic wand click frame expand by 5.
Open paper 13 copy and paste as a new layer.
Selections invert delete. Drag paper under frame.
Open Frame 4 resize by 500 drag under Frame 3.Add drop shadow.
Open element 45 resize by 350 copy and paste as a new layer duplicate Mirror . Copy and paste on each side of your frame at the bottom. Drop shadow.
OPen elements 5,6,7,8,and 9 resize by 200 copy and paste as a new layer as I have around the side of your frame.Add drop shadow.
Open 57 and resize by 200 copy and paste as a new layer on the right side of your frame as I have. Add drop shadow.
Open element 56 resize by 200 copy and paste as a new layer.Place in front of element 57. Drop shadow.
Open elements 50, 51 and 53 resize and place to at the bottom left of your tag.Add drop shadow as I have. Instead of black I used White.
Open your choice of tube copy and paste as a new layer behind your flowers and bottle caps as I have. Add drop shadow.
Add artist copyright info add name layers merge and your done!My tut is just a guide you can totally make it your own!
Thanks again for trying my tuts!
Vikkey
FTU Springy

FTU Springy
Supplies
Deanna(Butterfly Kisses Scraps) Scrap Kit: FTU Mini Kit St. Patty
Tube of Choice Im using Ismael Rac which you can buy at his site HERE:
Font of Choice
Eye Candy(optional)
Vix mask with you can DL here:
This one is a quickie but I love the spring colors!
Open new image 600x600
Open paper 2 copy and paste as a new layer.
New mask layer from image Vix mask 277. Layers Merge group.
Open frame3 copy and paste as a new layer.
Magic wand click frame expand by 5.
Open paper 1 copy and paste as a new layer.
Selections invert delete. Drag paper under frame.
Open Frame 4 resize by 500 drag under Frame 3.Add drop shadow.
Open heart flower duplicate Mirror your duplicate. Copy and paste in each side of your frame. Drop shadow.
OPen Stars and drag under your frames.Add drop shadow.
Open flower 2 and resize by 200 copy and paste as a new layer on each side of your frame as I have. Add drop shadow.
Open bow 1 resize by 200 copy and paste as a new layer.Place in center of your frames at the bottom like I have. Drop shadow.
Open your choice of tube copy and paste as a new layer behind your flowers and bow as I have. Add drop shadow.
Add artist copyright info add name layers merge and your done!My tut is just a guide you can totally make it your own!
Thanks again for trying my tuts!
Vikkey
Thursday, March 17, 2011
My Lips Like Sugar
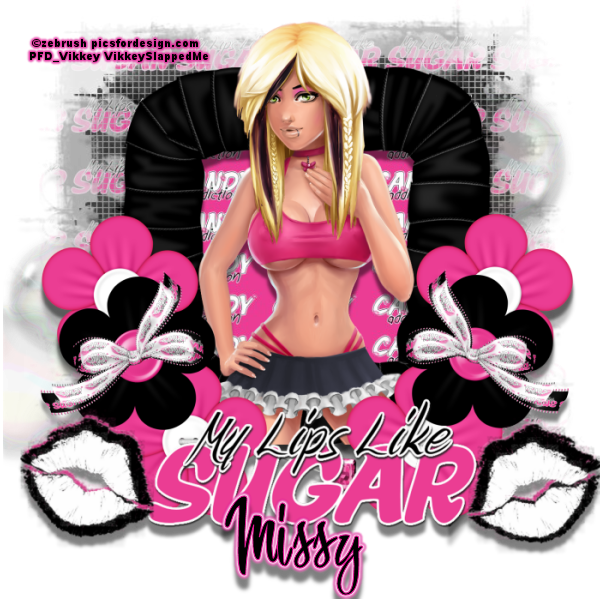
My Lips Like Sugar
Supplies
Supplies
Scrap kit by
Missy called
My Lips Like Sugar
http://www.scrapswithattitude.com/store/
Tube of Choice Im using Zebrush which you can buy at PFD HERE:
http://picsfordesign.com/en/
Font of Choice
Eye Candy(optional)
Vix mask with you can DL here:
http://www.freewebs.com/vixpsp/masks.htm
Open new image 600x600
Open paper 1 copy and paste as a new layer.
New mask layer from image Vix mask 404. Layers Merge group.
Open frame1 resize by 450 copy and paste as a new layer.
Magic wand click frame expand by 5.
Open paper 8 copy and paste as a new layer.
Selections invert delete. Drag paper under frame.
Open flower 2 and flower 2 resize by 200 copy and paste as a new layer on each side of the frame. Make sure you put the pink flower under the black one. Drop shadow.
Open bow 1 resize by 200 copy and paste as a new layer.Place in center of the black flower like I have. Drop shadow.
Open bow 3 resize by 150 copy and paste as a new layer in the center of bow 1 as I have. Add drop shadow.
Open wordart 1 resize by 450 copy and paste as a new layer at the bottom of your frame. Add drop shadow.
Open lips 1 and 2 resize by 200 copy and paste as a new layer stacking the black lips on top of the pink to where the pink is barely showing Like i did.
Open lips 3 resize by 150 copy and paste as a new layer on top of the black lips. Add drop shadow.
Open your choice of tube copy and paste as a new layer behind your word art as I have. Add drop shadow.
Add artist copyright info add name layers merge and your done!My tut is just a guide you can totally make it your own!
Thanks again for trying my tuts!
Vikkey
She is Hot S**t!
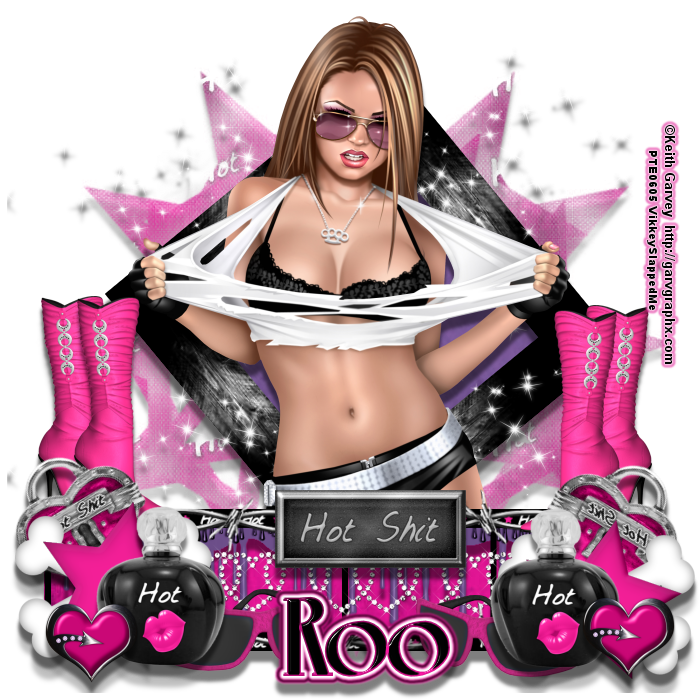
She is Hot S**T!
Supplies
Scrap by Roo called Hot S--t
here : http://www.digidivaz.com/store/
Tube of choice.
Im using Keith Garvey
here:
Supplies
Scrap by Roo called Hot S--t
here : http://www.digidivaz.com/store/
Tube of choice.
Im using Keith Garvey
here:
Font of Choice
Eye Candy(optional)
Vix Mask here
http://www.freewebs.com/vixpsp/masks.htm
This one is a quickie but to me the end result is beautiful!
Open new image 600x600
Open paper SBR12 copy and paste as a new layer.
Open Vix Mask 380.
Raster new mask layer from image. Choose Vix Mask 380. Layers merge group.
Open SBR26 copy and paste as a new layer.Use raster deform tool to turn it to where it looks like a diamond as I have.
Magic wand click frame modify expand 6.
Open paper SBR03 copy and paste as a new layer. Invert delete. Drag paper under frame.
Open Sbr37 copy and paste as a new layer above your frame.
Open SBR10 resize by 600 copy and paste as a new layer as I have toward the bottom of your frame.
Magic wand click frame selections modify expand by 5.
Open papER SBR10 Copy and paste as a new layer.Selections invert delete. Drag it under the frame.
Open SBR18 copy and paste as a new layer under SBR10.Drop shadow.
Open SBR38 resize by 600 copy and paste at the top and bottom of your film strip.Add Drop shadow.
Open SBR30 resize by 500 copy and paste as a new layer on top of your frame as I have. Drop shadow.
Open SBR33 Resize by 150 copy and paste as a new layer.Use raster deform tool to turn slightly.Duplicate mirror and place on opposit side. Drop shadow.
Open SBR09 resize by 200 copy and paste as a new layer on each sode of your frame at the bottom on top of the lock heart.
Open SBR20 Resize by 150 copy and paste as a new layer on each side of the tag toward the middle.
Open SBR24 resize by 175 copy and paste as a new layer. Add drop shadow.
Open SBR25 resize by 150 copy and paste as a new layer on the outside of the bottle.
Open SBR47 resize by 100 copy and paste as a new layer duplicate mirror and place on opposit side as I have.
Finally open SBR39 Resize by 150 copy and paste as a new layerin the center as I have.
You can add as many elements as you want the possibilites are endless with this kit. Remember to add drop shadow.
Finally open tube of choice copy paste as a new layer. Make sure you place your tube behind the bottom frame Like I have.Drop Shadow. Add artist copyright info if needed add name layers merge and your done!My tut is just a guide you can totally make it your own!
Thanks again for trying my tuts!
Vikkey
She's a Cherry Bomb

Shes a Cherry Bomb!
Supplies
Kelly(Angel's Designs) Scrap Kit:Cherry Bomb
http://www.scrapswithattitude.com/store/
Tube of Choice Im using Elias Chatzoudis which you can buy at PTE HERE:
http://psptubesemporium.com/
Font of Choice
Eye Candy(optional)
Vix mask with you can DL here:
http://www.freewebs.com/vixpsp/masks.htm
Open new image 600x600
Open paper 1 copy and paste as a new layer.
New mask layer from image Vix mask 431. Layers Merge group.
Open Stars Copy and paste as a new layer above the mask.Drop Shadow
Open Sparkles copy and paste as a new layer on top of the stars.
Open Frame 3 copy and paste as a new layer add gradient glow with these settings glow width 7.00 soft corners 25 overall opacity 100.Add drop shadow.
Sunglasses copy and paste as a new layer on top of Your frame in the center. Drop shadow.
OPen Lips resize by 100 copy and paste as a new layer duplicate mirror and place on each tip of your frame as I have.Add drop shadow.
Open Lollipop resize by 100 copy and paste as a new layer. Duplicate 3 more times copy and paste as I have.Use raster deform to turn them slightly. Drop Shadow.
Open Cherry and bow resize by 200 copy and paste as a new layer over the stems of the lollipop. Drop Shadow.
Open Wordart copy and paste at the bottom of your frame as I have.Drop shadow.
Open Martini glass resize by 200 copy and paste as a new layer at each end of the word art. Add drop shadow.
Open your choice of tube copy and paste as a new layer on top of your wordart as I have. Add drop shadow.
Add artist copyright info add name layers merge and your done!My tut is just a guide you can totally make it your own!
Thanks again for trying my tuts!
Vikkey
Kinky Bunny

Kinky Bunny
Supplies
Jen(Jens Sweet Temptations) Scrap Kit:Easter Egg-citement
http://www.scrapswithattitude.com/store/
Tube of Choice Im using Elias Chatzoudis which you can buy at PTE HERE:
http://psptubesemporium.com/
Font of Choice
Eye Candy(optional)
Open new image 600x600
Open Flower2 copy and paste as a new layer.
Make it into a circle.Add drop shadow.
Open Frame copy and paste as a new layer over the flowers.Make sure you can see the flowers around the edges of your frame.
Open paper 9.
Magic wand click on frame modify by 5
Copy and paste paper select invert delete drag under frame.
Open the close up of your tube. Click frame selections modify expand by 5. Copy and paste close up tube invert delete.Opacity 50%.
Open Decor 3&4 resize by 150 copy and paste on each side of your frame. Add Drop shadow.
Open Flowers 3 resize by 200 copy and paste on each side of your frame on top of decor 3&4.Add Drop shadow.
Open egg 1 resize by 200 copy and paste as a new layer on each side of your frame. Use raster deform tool to turn the egg slightly like i have.
Open egg 5 resize by 150 copy and paste as a new layer on the sides of Egg 1. Use raster deform to turn slightly as I have.
Open decor 2 and place at the bottom of your frame.
Pick a font and write Happy Easter.Or you can just leave it off.
Open your choice of tube copy and paste as a new layer in the center of your tag behind your word art. Add drop shadow.
Add artist copyright info add name layers merge and your done!My tut is just a guide you can totally make it your own!
Thanks again for trying my tuts!
Vikkey
Tuesday, March 15, 2011
Is This Wonderland?

Supplies
Ali(Designs By Ali) Scrap Kit:The Other Side of Wonderland
Tube of Choice Im using Tony Tzanoukakis which you can buy at PTE HERE:
Font of Choice
Eye Candy(optional)
Vix mask with you can DL here:
Open new image 600x600
Open paper 5 copy and paste as a new layer.
New mask layer from image Vix mask 404. Layers Merge group.
Open DBA Tube 1 resize by 350 Copy and paste as a new layer.Drop Shadow
Open DBA Tube 73 resize by 200 copy and paste as a new layer on each side of the door.
Open DBA Tube 74 resize by 150 copy and paste a s anew layer behind the red rose.Add drop shadow.
Open DBA Tube 26 resize by 100 copy and paste as a new layer on each side of the door as I have. Drop shadow.
OPen DBA Tube 42 resize by 200 copy and paste at the top of the door as I have.I put three but you can layer it as many times as you want to.
Open DBA Tube 27 resize by 200 copy and paste as a new layer on top of the previous steps.Duplicate mirror and paste on the other side. Drop Shadow.
Open DBA Tube 86 resize by 150 copy and paste as a new layer on each side of the door.Above the bush as I have. Drop Shadow.
Open DBA Tube 78 resize by 300 copy and paste as a new layer at the bottom of the door.Duplicate mirror and place the opposit was as I have.Drop shadow.
Open DBA Tubes 57 & 58 resize by 275 copy and paste as a new layer likeI have. I made them scattered below the previous step. Drop shadow.
Open DBA Tube 23 resize by 100 copy and place at the bottom of the door on top of the ribbon. Add drop shadow.
Finally open DBA Tube 39 resize by 300 copy and paste as a new layer in the right upper corner.
I changed the opacity to 50 to give it some flare.
(Kinda like Alice in Wonderland!)
Open your choice of tube copy and paste as a new layer on top of your ribbons in the center. Add drop shadow.
Add artist copyright info add name layers merge and your done!My tut is just a guide you can totally make it your own!
Thanks again for trying my tuts!
Vikkey
Monday, March 14, 2011
Tattoo Freak

Tattoo Freak
Supplies
Addictive Pleasure's Scrap kit
Tattoo here:
http://addictivepleasures.blogspot.com/
Tube of Choice Im using Eugene Rzhevskii which you can buy at PFD HERE:
http://picsfordesign.com/
Font of Choice
Eye Candy(optional)
Vix mask with you can DL here:
http://www.freewebs.com/vixpsp/masks.htm
Supplies
Addictive Pleasure's Scrap kit
Tattoo here:
http://addictivepleasures.blogspot.com/
Tube of Choice Im using Eugene Rzhevskii which you can buy at PFD HERE:
http://picsfordesign.com/
Font of Choice
Eye Candy(optional)
Vix mask with you can DL here:
http://www.freewebs.com/vixpsp/masks.htm
Open new image 600x600
Open wire 1 copy and paste as a new layer.Add Drop shadow.
Open Decor 2 resize by 500 copy and paste as a new layer above wire 1.Add drop shadow.
Open ribbon 4 copy and paste above wire 1 duplicate mirror paste as a new layer.Add Drop shadow.
open ribbon 3 copy and paste as a new layer above ribbon 4. Duplicate copy and paste as a new layer on the opposit side. Drop shadow.
Open stars copy and paste as a new layer duplicate 3 more times and paste like i have. Add Drop Shadow.
OPen Frame Copy and paste as a new layer.
Above all the previous steps.Add drop shadow.
OPen Frame 3 and resize by 500 copy and paste as a new layer.
Select magic wand click frame modify expand by 5. Open paper 3 selections modify invert delete drag under frame.
Open ribbon2 copy and paste at the bottom o of the frame.Add drop shadow.
Open barbedwire2 copy and place at bottom of frame above ribbon2.
Open Ribbon 2 resize by 500 copy and paste as a new layer above your ribbon and barbedwire.
Open Skull and place in the middle of your frame.Add drop shadow.
OPen Star copy and paste as a new layer on each side of your frame.Use raster deform tool to turn slightly as I have. Add Drop shadow.
Open tattoo resize by 200 copy and paste as a new layer on each side of your tag at the bottom. Add drop shadow.
OPen bow 3 resize by 100 copy and paste as a new layer on each side of your tag in the center. Add drop shadow.
You can add as many elements as you want the possibilites are endless with this kit. Remember to add drop shadow.
Finally open tube of choice copy paste add artist copyright info if needed add name layers merge and your done!My tut is just a guide you can totally make it your own!
Thanks again for trying my tuts!
Vikkey
For The Love Of Blue and Black!

Supplies
Vicki's(Pink Princess Scraps) Scrap Kit: Bunny Love Blue
http://pinkprincessscraps.blogspot.com/
Tube of Choice Im using Keith Garvey which you can buy at PTE HERE:
http://psptubesemporium.com/
Font of Choice
Eye Candy(optional)
Vix mask with you can DL here:
Vicki's(Pink Princess Scraps) Scrap Kit: Bunny Love Blue
http://pinkprincessscraps.blogspot.com/
Tube of Choice Im using Keith Garvey which you can buy at PTE HERE:
http://psptubesemporium.com/
Font of Choice
Eye Candy(optional)
Vix mask with you can DL here:
Paintshop Pro 9
But any version will do.
Open new image 600x600
Open paper 4 copy and paste as a new layer.
New mask layer from image Vix mask 396. Layers Merge group.
Open element 52 Copy and paste as a new layer.Duplicate mirror copy opposite as you did the other one.
OPen Frame element 36 resize by 500 Copy and paste as a new layer.
Select magic wand click frame modify expand by 5. Open paper 4 Selections invert delete drag paper under frame.Open element63 Stars paste above frame.
Open element 59 copy and paste as a new layer at the bottom of your frame.Add drop shadow .
Open Element59 mirror copy and paste on top of frame at bottom over element 58. Drop shadow.
open element 33 resize by 150 copy and paste as a new layer on each side of your frame.Drop shadow.
Open Element 12 and 15 resize by 150 copy and paste on each side of your frame.Add Drop shadow.
Open Element 34 and 35 resize by 150 copy and paste as new layers as I have on each side of your frame. Add drop shadow.
Open Element 50 resize by 200 copy and paste as a new layer at the bottom of your frame in the center.Add drop shadow.
Open Element 51 resize by 150 copy and paste as a new layer on top of the bottom your put on in the previous step. Add Drop shadow.
Open your choice of tube copy and paste as a new layer Behind your bows. Add drop shadow.
Add artist copyright info add name layers merge and your done!My tut is just a guide you can totally make it your own!
Thanks again for trying my tuts!
Vikkey
Spring Has Sprung
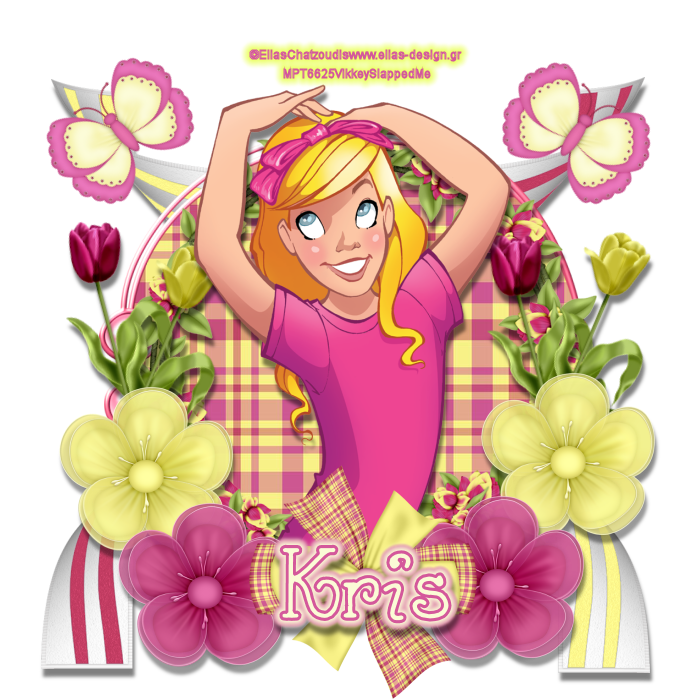
Spring Has Sprung
Supplies
Scrap by Kris(Mystical Illusionz) called Strawberry Banana
here :
Supplies
Scrap by Kris(Mystical Illusionz) called Strawberry Banana
here :
http://psptubesemporium.com/
Font of Choice
Eye Candy(optional)
This one is a quickie but to me the end result is beautiful!
Open new image 600x600
Open Frame2 resize by 500 copy and paste as a new layer. Choose magic wand click indside frame selections modify expand by 5.
Open paper 16 copy and paste as a new layer. Selections invert delete. Drag paper under frame.
Open frame 4 resize by 450 copy and paste as a new layer above frame 2. Add Drop shadow.
Open ribbon 1 and 2 resize by 500 copy and paste as a new layer under you frames and paper like i have.Add Drop shadow.
Open tulip 2 and 3 resize by 100 copy and paste as a new layer on each side of your frames. Use raster deform to rotate slighty like I have. Add Drop shadow.
OPen Organza 1 and 2 resize by 200. Copy and paste as a new layer on each side of your frame like as I have.Make sure they are on top of the Tulips.
Open bowcute resize by 250 copy and paste at the bottom of your frames. Add Drop shadow.
Open butterfly resize by 200 copy and paste at top of frame on each end of your ribbon as I have. I used the raster deform tool to turn them slightly. Add Drop Shadow.
You can add as many elements as you want the possibilites are endless with this kit. Remember to add drop shadow.
Finally open tube of choice copy paste as a new layer. Make sure you place your tube behind the bow Like I have.Drop Shadow. Add artist copyright info if needed add name layers merge and your done!My tut is just a guide you can totally make it your own!
Thanks again for trying my tuts!
Vikkey
Thursday, March 10, 2011
Do The Pretty Girl Rock

Do the Pretty Girl Rock
Supplies
Scrap by Toxic called Rawkalicious @ Scraps With Attitude
here : http://www.scrapswithattitude.com/store/
Tube of choice.
Im using Jose Cano here:
Supplies
Scrap by Toxic called Rawkalicious @ Scraps With Attitude
here : http://www.scrapswithattitude.com/store/
Tube of choice.
Im using Jose Cano here:
http://psptubesemporium.com/
Font of Choice
Eye Candy(optional)
Vix mask with you can DL
http://www.freewebs.com/vixpsp/masks.htm
Open new image 700x700
Open paper 17 copy and paste as a new layer.Raster new mask layer from image Vix Mask 410
Hit ok. Layers merge group.
Open sparles 1 copy and paste as a new layer over your mask.Add drop shadow.
Open the cd copy and paste as a new layer on top of your mask.
Open The disco ball copy and paste over the CD.Add drop shadow.
Open Ribbon 2 copy and paste on top of the Disco Ball. Duplicate mirror and place on other side. Add Drop shadow.
Open piano keys and notes copy and paste as a new layer in the center of the Disco Ball.
Open Club Scene copy and paste as a new layer at the bottom of the Disco ball like I have. Add Drop Shadow.
Open Guitar Doodle resize by 200 copy and paste on each side of the disco ball. Add Drop shadow.
Open Speakers resize by 300 copy and paste as a new layer at the bottom of your tag as I have.
Add Drop shadow.
Open Heart and melted ice element resize by 200 copy and paste as a new layer in front of the speakers.Add Drop Shadow.
Open Heart resize by 200 copy and paste as a new layer behind the Heart and melted ice element.Add Drop shadow.
Open heart notes resize by 100 copy and paste on each side of the disco ball like I have above the guitars. Add Drop Shadow.
You can add as many elements as you want the possibilites are endless with this kit. Remember to add drop shadow.
Finally open tube of choice copy paste as a new layer. Make sure you place your tube behind the club scene Like I have.Drop Shadow. Add artist copyright info if needed add name layers merge and your done!My tut is just a guide you can totally make it your own!
Thanks again for trying my tuts!
Vikkey
My Belladonna Princess

My Belladonna Princess
Supplies
Scrap by Rieka called Goth Princess @ Scraps With Attitude
here : http://www.scrapswithattitude.com/store/
Tube of choice.
Im using Unholy Vault Designs here:
Supplies
Scrap by Rieka called Goth Princess @ Scraps With Attitude
here : http://www.scrapswithattitude.com/store/
Tube of choice.
Im using Unholy Vault Designs here:
http://psptubesemporium.com/
Font of Choice
Eye Candy(optional)
Vix mask with you can DL
http://www.freewebs.com/vixpsp/masks.htm
This one is a quickie but to me the end result is beautiful!
Open new image 600x600
Open paper 7 copy and paste as a new layer.Raster new mask layer from image Vix Mask 431
Hit ok. Layers merge group.
Open castle resize by 500 copy and paste as a new layer.Add drop shadow.
Open Sparkle 1 copy and paste as a new layer behind the castle.
Open Moon resize by 200 copy and paste in top left hand corner .Make sure it is above the sparkle.Add drop shadow.
Open tomb resize by 200 copy and paste as a new layer. Duplicate mirror and place on other side of tag. Add Drop shadow.
Open Flower 4 resize by 175 copy and paste as a new layer behind the tombs as I have. Duplicate mirror and place behind other side.
Open candle 2 resize by 200 copy and paste as a new layer in front of tombs on each side of your tag.
Open Flower 1 copy and paste as a new layer over both tombs like I have.Try to make it centered. Add Drop shadow.
Open flower 2 resize by 200 copy and paste a s a new layer on each side of the tomb. Add Drop shadow.
You can add as many elements as you want the possibilites are endless with this kit. Remember to add drop shadow.
Finally open tube of choice copy paste as a new layer. Make sure you place your tube behind frame 1 Like I have.Drop Shadow. Add artist copyright info if needed add name layers merge and your done!My tut is just a guide you can totally make it your own!
Thanks again for trying my tuts!
Vikkey
Drinks On Me

Drinks on Me
Supplies
Scrap by Angel called SaraLicious @ Scraps With Attitude
here : http://www.scrapswithattitude.com/store/
Tube of choice.
Im using Tim Lowery here:
Supplies
Scrap by Angel called SaraLicious @ Scraps With Attitude
here : http://www.scrapswithattitude.com/store/
Tube of choice.
Im using Tim Lowery here:
http://psptubesemporium.com/
Font of Choice
Eye Candy(optional)
Vix mask with you can DL
http://www.freewebs.com/vixpsp/masks.htm
Open new image 600x600
Open paper 5 copy and paste as a new layer.Raster new mask layer from image Vix Mask 380
Hit ok. Layers merge group.
Open Flower 2 copy and paste 4 times making a circle over your mask as a new layer.Add drop shadow.
Open frame 2 and place over your flowers.
Select magic wand click frame modify expand by 5. Open paper 1 copy paste Selections invert delete drag paper under frame.
Open frame 1 and place at the bottom overtop of frame 2 as I have.
Select magic wand click frame1 modify expand by 5. Open paper 9 copy paste Selections invert delete drag paper under frame.
Open tube of choice. Select frame again paste tube over selection invert delete drag under frame but make sure it is on top of your paper.While tube is still selected change to Luminance Legacy.
Open stars glitter trail copy and paste as a new layer over frame 1 at the bottom.
Open Lips 1 resize by 100 copy and paste as a new layer in middle of frame1.Add Drop shadow.
Open Bow resize by 150 copy and paste as a new layer on frame 2 as I have.Add Drop shadow.
Open Martini glass resize by 200 copy and paste as a new layer place at each end of frame 1.Add drop shadow.
You can add as many elements as you want the possibilites are endless with this kit. Remember to add drop shadow.
Finally open tube of choice copy paste as a new layer. Make sure you place your tube behind frame 1 Like I have.Drop Shadow. Add artist copyright info if needed add name layers merge and your done!My tut is just a guide you can totally make it your own!
Thanks again for trying my tuts!
Vikkey
Wednesday, March 9, 2011
Steampunk Hottie

Supplies
Scrap Steampunk Angel by Toxic @ Scraps With Attitude
here : http://www.scrapswithattitude.com/store/
Tube of choice.
Im using Keith Garvey here:
Scrap Steampunk Angel by Toxic @ Scraps With Attitude
here : http://www.scrapswithattitude.com/store/
Tube of choice.
Im using Keith Garvey here:
http://psptubesemporium.com/
Font of Choice
Eye Candy(optional)
Vix mask with you can DL
http://www.freewebs.com/vixpsp/masks.htm
Open new image 600x600
Open paper 3 copy and paste as a new layer.Raster new mask layer from image Vix Mask 431
Hit ok. Layers merge group.
Open Steampunk scattered hearts copy and paste over your mask as a new layer .
Open sparkles 2 and place over your hearts .
Open porthole resize by 500 copy and paste as a new layer.
Select magic wand click frame modify expand by 7. Open paper 23 copy paste Selections invert delete drag paper under porthole.
Open Doodle resize by 250 copy and paste as a new layer at bottom of porthole.Duplicate mirror and place on opposit side as I have.
Open flowers 1 and 2 and resize by 150 copy and paste as a new layer on each side of the porthole.
Open candle resize by 100 copy and paste as a new layer place in front of flowers 1&2.Add drop shadow.
Open flowers resize by 200 copy and paste as a new layer behind your flowers 1&2 as i have on each side. Add Drop shadow.
Open Ribbon 2&3 resize by 300 copy and paste as a new layer toward bottom of frame.
Open lips 1 resize by 200 copy and paste as a new layer at the bottom of your candles Duplicate mirror and place over the other candle.
Open Butterfly 1 resize by 100 copy and paste as a new layer on each side of the porthole. Add drop shadow.
You can add as many elements as you want the possibilites are endless with this kit. Remember to add drop shadow.
Finally open tube of choice copy paste as a new layer. Make sure you place your tube behind the ribbons Like I have.Drop Shadow. Add artist copyright info if needed add name layers merge and your done!My tut is just a guide you can totally make it your own!
Thanks again for trying my tuts!
Vikkey
Tuesday, March 8, 2011
My Dark Love

My Dark Love
Supplies
Scrap Rieka Rafita @ Scraps With Attitude
here : http://www.scrapswithattitude.com/store/
Tube of choice.
Im using Unholy Vault Designs here:
Supplies
Scrap Rieka Rafita @ Scraps With Attitude
here : http://www.scrapswithattitude.com/store/
Tube of choice.
Im using Unholy Vault Designs here:
http://psptubesemporium.com/
Font of Choice
Eye Candy(optional)
Vix mask with you can DL
http://www.freewebs.com/vixpsp/masks.htm
Open new image 600x600
Open paper 1 copy and paste as a new layer.Raster new mask layer from image Vix Mask 388
Hit ok. Layers merge group.
Open Steampunk hearts 5 copy and paste over your mask as a new layer mirror flip and place.
Open Blood splatter and place over your hearts 5 .
Open Frame 1 resize by 500 copy and paste as a new layer.
Select magic wand click frame modify expand by 7. Open paper 2 copy paste Selections invert delete drag paper under frame.
Open Thorns and place in middle of frame as I have.
Open Sparkle 1 copy and paste as a new layer drag under frames. Make sure it is showing on top of paper in middle of frame.
Open Steampunk heart 2 copy and paste as a new layer place under your frame as I have. Duplicate mirror and place on opposite side under frame.
Open Ribbon2 copy and paste as a new layer toward bottom of frame.
Open Steampunk heart 3 copy and paste as a new layer on the right side of your frame.
OPen Steampunk heart 4 mirror copy and paste as a new layer on the left side of your tag as I have.
Open Flower 3 resize by 200 copy and paste as a new layer duplicate mirror and place over your ribbon at the bottom.
Open Steampunk heart 1 resize by 300 copy and paste as a new layer at the bottom center over your ribbon.
OpenWordart resize by 200 copy and paste as a new layer over the heart you just placed over the ribbon.
Open Lips resize by 200 copy and paste as a new layer on each side of your frame as I have.
You can add as many elements as you want the possibilites are endless with this kit. Remember to add drop shadow.
Finally open tube of choice copy paste as a new layer. Make sure you place your tube behind the heart and word art Like I have.Drop Shadow. Add artist copyright info if needed add name layers merge and your done!My tut is just a guide you can totally make it your own!
Thanks again for trying my tuts!
Vikkey
Punk You!

Punk You
Supplies
Supplies
PSP 9 Is what I am using but any can be used
Scrap by (Vicki) Pink Princess Scraps Punk You
here : http://pinkprincess-scraps.com/
Tube of choice.
Im using Jose Cano here:
Scrap by (Vicki) Pink Princess Scraps Punk You
here : http://pinkprincess-scraps.com/
Tube of choice.
Im using Jose Cano here:
http://psptubesemporium.com/
Font of Choice
Eye Candy(optional)
Vix mask with you can DL
http://www.freewebs.com/vixpsp/masks.htm
Open new image 600x600
Open paper 12 copy and paste as a new layer.Raster new mask layer from image Vix Mask 431
Hit ok. Layers merge group.
Open element 1 and paste over your mask.
Open element 58 and 42 place over element 1.
Open element 40 copy and paste as a new layer over your mask place a total of 4 flowers making a circle.
Open element 9 and place over element 40 as I have.
OPen frame 31 Copy and paste as a new layer.
Select magic wand click frame modify expand by 7. Open paper 2 copy paste Selections invert delete drag paper under frame.
Open element 6 resize by 300 copy and paste in at the bottom of your frame as I have.Duplicate mirror place on opposite side.
Open element 7 resize by 200 copy and paste as a new layer of element 6 duplicate mirror and place on opposite side.
Open element 48 resize by 200 copy and paste as a new layer.In the middle of your previous ribbons you placed.
Open element 17 resize by 350 copy and paste as a new layer on top of your ribbons as I have.
Open element 3 copy and paste as a new layer at the bottom of your ribbon as I have.
OPen element 11 resize by 150 copy and paste as a new layer. duplicate mirror and place on each side of your frame.
Open element 23 resize by 200 copy and paste as a new layer in front of ring. Duplicate mirror and place on opposite side.
Open element 24 resize by 200 copy and paste as a new layer in front of heart. Duplicate mirror and place on opposite side.
Open element 13 resize by 200 copy and paste as a new layer on each side bottom of your frame as I have.
Open element 12 resize by 100 copy and paste as a new layer on the center of your black flowers as I have.
Open element 5 resize by 200 and copy and bottom center of your frame as I have.
You can add as many elements as you want the possibilites are endless with this kit. Remember to add drop shadow.
Finally open tube of choice copy paste as a new layer. Make sure you place your tube behind the bow Like I have.Drop Shadow. Add artist copyright info if needed add name layers merge and your done!My tut is just a guide you can totally make it your own!
Thanks again for trying my tuts!
Vikkey
Sunday, March 6, 2011
Welcome Spring

Supplies
Deanna's Scrap Kit: Spring Wishes
http://bkscraps.blogspot.com/
Tube of Choice Im using Suzanne Woolcott which you can buy HERE:
http://www.gorjussart.com/store/
Font of Choice
Eye Candy(optional)
This tut is gonna be a quickie but the end result is so cute!
Open new image 600x600
Open Diamond decor paste as a new layer.
open flower doodle 2 copy and paste as a new layer
Duplicate mirror and flip.Add drop shadow ad you go.
Open Frame 5 Copy and paste as a new layer.
Select magic wand click frame modify expand by 5. Open paper 12 copy and paste as a new layer Selections invert delete drag paper under frame.
Open Rainbow copy and paste as a new layer in middle of frame like i have. Add drop shadow.
Open string bow 1 and 2 copy and paste as a new layer at bottom of your frame.Add drop shadow.
Open Cloud one resize by 150 copy and paste as a new layer.Duplicate mirror and paste on opposit side. Drop shadow.
open Wordart 2 copy and paste as a new layer in middle of frame.Drop shadow.
Open your choice of tube copy and paste as a new layer to the middle of the frame as I have.Make sure you put it behind your word art.Add drop shadow
Add artist copyright info add name layers merge and your done!My tut is just a guide you can totally make it your own!
You can add as many elements as you want. You can go crazy with this kit!
Thanks again for trying my tuts!
Vikkey
Hysteria

Supplies
Bello Scarto Scrap Kit: Hysteria
http://belloscarto.blogspot.com/
Tube of Choice Im using Keith Garvey which you can buy at PTE HERE:
http://psptubesemporium.com/index.php?p=home
Font of Choice
Eye Candy(optional)
Vix mask with you can DL here:http://www.freewebs.com/vixpsp/masks.htm
Open new image 600x600
Open paper 2 copy and paste as anew layer.
Raster new mask layer from image Choose Vix mask 265. Layers merge group.
OPen Frame 34 resize by 500 Copy and paste as a new layer.
Select magic wand click frame modify expand by 5. Open paper 3 Selections invert delete drag paper under frame.Open element 31 one and drag under frame.Add drop shadow.
Open element 47 resize by 200 copy and paste on the right side of your frame.Duplicate mirror and put on left side of frame as I have.Add drop shadow .
Open element 51 resize by 175 copy and paste as a new layer use raster deform to rotate to the left .duplicate mirror and paste on opposite side. Drop shadow.
open element16 resixe by 600 copy and paste as a new layer in middle of frame.Drop shadow.
Open element resize by 200 drop shadow place at bottom on top of frame in front of boots.Add drop shadow.Duplicate mirror place of opposite side of frame.
Open element 1 resize by 200 copy and paste as a new layer duplicate mirror add to opposite side. Add drop shadow.
You can add as many elements as you want. You can go crazy with this kit!
Open your choice of tube copy and paste as a new layer to the right of the frame as I have..
Add artist copyright info add name layers merge and your done!My tut is just a guide you can totally make it your own!
Thanks again for trying my tuts!
Vikkey
Saturday, March 5, 2011
Gothic

Supplies
Stef's Scrap Kit: Blue Gothic
http://stefs-scrapkits.blogspot.com/
Tube of Choice Im using Elias Chatzoudis which you can buy at PTE HERE:
http://psptubesemporium.com/index.php?p=home
Font of Choice
Eye Candy(optional)
Vix mask with you can DL here:
Stef's Scrap Kit: Blue Gothic
http://stefs-scrapkits.blogspot.com/
Tube of Choice Im using Elias Chatzoudis which you can buy at PTE HERE:
http://psptubesemporium.com/index.php?p=home
Font of Choice
Eye Candy(optional)
Vix mask with you can DL here:
http://www.freewebs.com/vixpsp/masks.htm
Open new image 600x600
Open paper 1 Copy and paste as a new layer.
open Vix mask 374. Rater layer new mask layer from inmage choose Vix mask 366.
Layers merge group.
Open Frame2resize by 500 copy and paste as a new layer.
Select magic wand click frame modify expand by 5. Open paper 13 copy and paste as a new layer. Selections invert delete drag paper under frame.
Open Swirl 1 copy and paste under your frame image mirror flip and paste at top under frame.Add drop shadow.
Open stars and place in middle of your frame add srop shadow i changed color to white.Add drop shadow.
Open clip 1 resize by 200 copy and paste on each corner of your frame. Drop shadow.
open bow 3 and resize by 500 copy and paste as a new layer between the clips you just placed at top of your frame. Add Drop shadow.
Open Flowers 6 and 7 resize by 200 copy and paste as a new layer to look like a cluster at the bottom like i have.
Open flower 5 copy and paste as a new layer on each side above flowers and paste on in the middle also. add drop shadow.
Open tag 1 word art GOTHIC resize by 200 copy and paste as a new layer in the middle of your flowers at bottom. Add drop shadow.
Open your choice of tube copy and paste as a new layer to the right of the frame as I have..
Add artist copyright info add name layers merge and your done!My tut is just a guide you can totally make it your own!
Thanks again for trying my tuts!
Vikkey
Yummy

Supplies
Stef's Scrap Kit: Hot Chocolate
http://stefs-scrapkits.blogspot.com/
Tube of Choice Im using Elias Chatzoudis which you can buy at PTE HERE:
http://psptubesemporium.com/index.php?p=home
Font of Choice
Eye Candy(optional)
Vix mask with you can DL here:
Stef's Scrap Kit: Hot Chocolate
http://stefs-scrapkits.blogspot.com/
Tube of Choice Im using Elias Chatzoudis which you can buy at PTE HERE:
http://psptubesemporium.com/index.php?p=home
Font of Choice
Eye Candy(optional)
Vix mask with you can DL here:
http://www.freewebs.com/vixpsp/masks.htm
Open new image 600x600
OPen paper 16 Copy and paste as a new layer.
open Vix mask 366. Rater layer new mask layer from inmage choose Vix mask 366.
Layers merge group.
Open Frame3 resize by 500 copy and paste as a new layer.
Select magic wand click frame modify expand by 5. Open paper 10 copy and paste as a new layer. Selections invert delete drag paper under frame.
Open button 3 and resize by 300 copy and paste at bottom center of your frame.Add drop shadow.
Open ribbon 3 resize by 275 place behind your button at the bottom on each side.Add drop shadow.
Open Flowers 1 and Flowers 3 resize by 200 copy and paste on each side of your frame. Drop shadow.
open Flower 2 and resize by 100 copy and paste as a new layer on each side of your button. Add Drop shadow.
Open Lollipop 1 resize by 100 copy and paste as a new layer on each side of frame behind flowers.
Open Dragonflies resize by 200 copy and paste as a new layer on each side above flowers add drop shadow.
Open word art 3 yummy resize by 200 copy and paste as a new layer image rotate clockwise 90. Add to right side of frame. Add drop shadow.
Open your choice of tube copy and paste as a new layer to the right of the frame as I have..
Add artist copyright info add name layers merge and your done!My tut is just a guide you can totally make it your own!
Thanks again for trying my tuts!
Vikkey
Thursday, March 3, 2011
Problem With Me?!
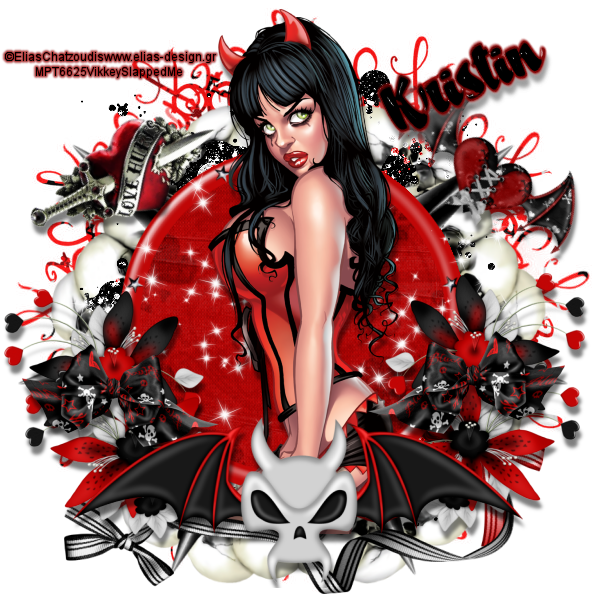
Problem with me?!
Supplies
Scrap by Toxic Desirez here:
http://www.scrapswithattitude.com/store/
Tube of choice I am using Elias Chatzoudis
you can purchase here:
http://psptubesemporium.com/index.php?p=home
Font of Choice
Eye Candy(optional)
Vix mask with you can DL here:
Supplies
Scrap by Toxic Desirez here:
http://www.scrapswithattitude.com/store/
Tube of choice I am using Elias Chatzoudis
you can purchase here:
http://psptubesemporium.com/index.php?p=home
Font of Choice
Eye Candy(optional)
Vix mask with you can DL here:
http://www.freewebs.com/vixpsp/masks.htm
Open new image 600x600
Open paper 9 copy and paste as a new layer.Raster new mask layer from image Vix Mask 396
Hit ok. Layers merge group.
OPen frame 2 resize 500 Copy and paste as a new layer.
open Frame1 resize by 500 copy and paste as a new layer over frame 9.
Select magic wand click frame1 modify expand by 4. Open paper 19 copy paste Selections invert delete drag paper under frame 9.
Open sparkles copy and paste as a new layer under frame1.
OPen splatter copy and paste as a new layer under frame 1 and paper.
Open Ribbon 1 and Ribbon 2 and resize by 400 and place at bottom of frame.Add drop shadow.
Open winged skull resize by 400 copy and paste as a new layer as I have at bottom of frames.
Open Flower 1 and flower 2 and resize by 200 copy and paste as a new layer on each side of the tag as I have add drop shadow.
Open Bow 2 resize by 200 copy and paste as a new layer in the center of the flowers on each side as I have. Add Drop shadow.
Open heart and dagger element and Laced up heart resize by 200 copy and paste as a new layer one in each side of the tag. Add drop shadow.
You can add as many elements as you want the possibilites are endless with this kit. Remember to add drop shadow.
Finally open tube of choice copy paste add artist copyright info if needed add name layers merge and your done!My tut is just a guide you can totally make it your own!
Thanks again for trying my tuts!
Vikkey
All Alone

Im Dangerous
Supplies
Scrap by Pink Girls Designz Gothic Dangerous :
Supplies
Scrap by Pink Girls Designz Gothic Dangerous :
http://www.scrapswithattitude.com/store/
Tube of choice I am using Ismael Rac you can purchase here:
Tube of choice I am using Ismael Rac you can purchase here:
http://www.freewebs.com/vixpsp/masks.htm
Open new image 600x600
Open paper 1 copy and paste as a new layer.Raster new mask layer from image Vix Mask 401
Hit ok. Layers merge group.
OPen frame 4 resize 500 Copy and paste as a new layer.
Select magic wand click frame modify expand by 4. Open paper 5 copy paste Selections invert delete drag paper under frame.
Select frame again with magic wand open tube of choice copy paste and delete.Chande opacity of tube to 52.
Open decor heart resize by 100 and place at top of frame on each corner add drop shadow.
Open Rose Rose 1 and Rose 2 resize them all by 100. Copy and paste as new layers in each side of you frame at the bottom.Add desired drop shadow.
Open Decor 2 resize by 100 copy and paste as a new layer on the inside of each rose cluster you created in the previous steps.Adding drop shadow to your liking.
You can add as many elements as you want the possibilites are endless with this kit. Remember to add drop shadow.
Finally open tube of choice copy paste add artist copyright info if needed add name layers merge and your done!My tut is just a guide you can totally make it your own!
Thanks again for trying my tuts!
Vikkey
Subscribe to:
Posts (Atom)
About Me

- Vikkey Edwards
- Hi there! I am the mom of two great kids John David who is 11 and a daughter Cierra who is 10. I have been married to the love of my life for almost 11 years now. I have been in PSP for about 2 years now and im loving it! Thanks to a very special friend who pushed me to write tuts! Loves ya girlie! That's about it from me. Want to know anything else please feel free to ask me.! Want to contact me or show me the results of one of my tuts please email me @ tutsbyvikkey@yahoo.com
I AM A CT OF


Forums I Love